I’ve recently started using ICE pretty regularly at work, nothing too complicated so far, mostly for controlling groups of instanced geometry like soap bubbles floating through the air and lines of marching ants. With the ants especially It became apparent that the default emitters had a couple of interesting “features” that would cause problems, getting a predictable, steady, stream of particles to come out at say, 1 per second, for example, was much more difficult than anticipated. So with some digging around and a point in the right direction from one of the many nice folk at XSI Base, I set about making my own emitter from scratch. Since at the time I couldn’t find any tutorials that explained the process from start to finish (although this was very helpful) I thought I’d write up my own. The following tutorial assumes you know Softimage and that you’ve perhaps had a poke around in ICE without delving in too far, it sets out to take you from an empty pointcloud to a simple particle emitter compound you can export and use again.
First things first, open yourself up a nice new scene and create an empty Point Cloud.
- Get > Primitive > Point Cloud > Empty
With this still selected, pressing Alt-9 will bring up the ICE Tree, very empty looking at the moment, our pointcloud needs a few basic things before we get started.
- Create > Simulated Ice Tree
If you’re not familiar at all with ICE, the little green square that has just appeared is an ICETree node and all attributes and systems that you set up will be made from similar nodes and compounds thereof and they all have to come through this little chap. Next, as we are going to want our particles to move around, we need a simulation node. ICE has a few hundred different nodes to pick from, all arranged in sections on the left of the ICE Tree window, you can click through the different menus to find the particular node your after but a much quicker way is to use the search bar at the top which will update and narrow down all the nodes you can select from as you type.
- The node we’re looking for is called Simulate Particles. Once you’ve found it drag it into the ICETree.
- Drag connect from Simulate Particles.Simulate -to- ICETree.New (Port1)
The ICETree node will expand to accommodate as many Ports as you need, either like you’ve just done by plugging a node into a New (port#) or by right clicking an existing one and selecting Insert Port Before or Insert Port After, although not always strictly necessary it’s good practice to keep your Simulate node to the bottom. Now we have the basics in place we need a few more nodes to create the particles themselves.
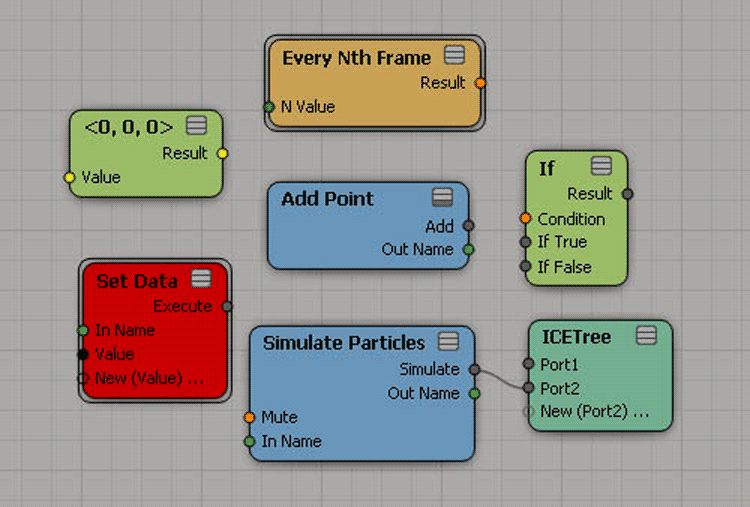
- Drag a 3d Vector, an Add Point, an Every Nth Frame, a Set Data, and an If node into the ICETree.
Your tree should look something like this:

Some of these nodes have self explanatory names, others not so much, the first important one is the Add Point, which adds points in a continuous stream (in this case points are just another name for particles). It also provides ports for control over where they appear (Positions#) and what happens every time one is created (On Creation#). For starters we can use the 3D Vector node to dictate where our particles are going to emit from.
- Drag connect from 3D Vector.Result -to- Add Point.Positions1
- Drag connect from Add Point.Add -to- ICETree.Port1
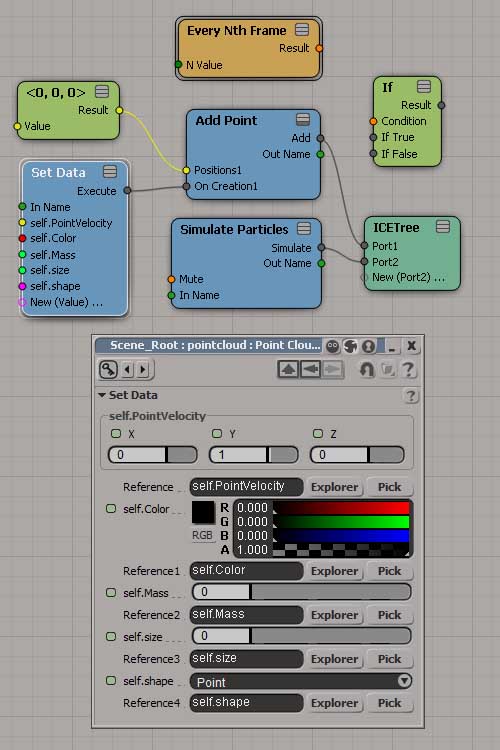
At this stage if you play your timeline you’ll see a little dot. Hooray! It lives! Just like you asked, a stream of points is being added at the 3D vector <0, 0, 0>, the origin of the scene. If you want you can double click the 3D Vector node and input your own values, playing back the timeline from the start will result in the points being added at the new position instead. Dots are all well and good, but for something a little more interesting we can use the Set Data node to change some attributes. By default the Set Data node has one empty Value that it “sets” but, just like the ICETree node, it expands as per your requirements, and can be used to control hundreds of different attributes (There’s a list here). Nearly everything in ICE is done by Getting and Setting Data. For starters we’ll be wanting to set Self.PointVelocity so our particles will move. ICE uses the same dot syntax as everything else in XSI and in this situation we want our Set Data node to act on the pointcloud it lives in so we need to make sure Self. is at the beginning of our attributes.
- Double click the Set Data node
- In the empty text box beside Reference, type self
- Click the Explorer button, expand Point Cloud, select Pointvelocity.
- Set the self.PointVelocity Y value to 1
- Drag connect Set Data.Execute -to- Add Point.On Creation1
If you play the timeline from the start again we can now see a constant stream of dots moving up in Y from our 3D vector. The attributes we are setting with the Set Data node are being set per particle on their creation, hence using the On Creation port on the Add Point node. At this stage you can add whatever other attributes you might need for your cloud.
- Right click on Set Data.self.PointVelocity, select Insert Port Before or After
- Follow the steps as for self.PointVelocity only pick the different attributes you require, common ones include Color, Shape, Size and, if you’re going to be using forces, Mass.
- For each new attribute you’ll need to insert a new port.
You’ll notice different attributes open up their own respective options within the Set Data node, handy. Your ICETree should now resemble this:
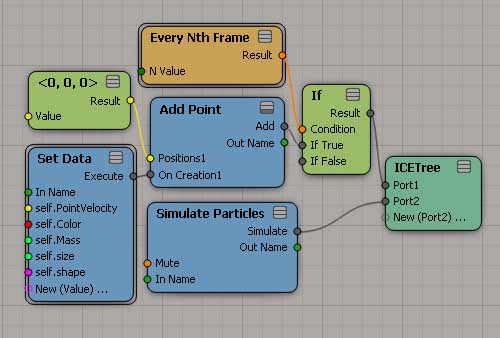
Currently all our particles are being added in a continuous stream every frame by the Add Point node, we can impose some control on this using our other two remaining nodes, the Every Nth Frame and the If. The If node provides us with the means to define a Condition and two ports to execute in the event this condition is met or not; If True and If False respectively. In this case Every Nth Frame will be our condition, essentially every certain number of frames (N) the condition will be true and we can tell the Add Point node to do its thing, otherwise to sit still and do nothing.
- Disconnect Add Point.Add -from- ICETree.Port1
- Drag connect Add Point.Add -to- If.If True
- Drag connect Every Nth Frame.Result -to- If.Condition
- Drag connect If.Result -to- ICETree.Port1
The default value for N is 9 so if you play your timeline from the start you will see that a particle is now emitted once every 9th frame. At this stage our cloud is pretty much finished, we have control over all the attributes of the particles emitted like size and shape and color, where they are emitted from and how often. If you’re planning on using this emitter again or sharing it with someone else however, it could do with a bit of tidying up. This is where compounds are very useful, they allow us to wrap up multiple nodes within one single node and export them.
- Select everything except the ICETree and the Simulate Particles nodes
- From the top menu bar select Compounds > Create Compound
- Right click the new CompoundNode, select Compound Properties
- Give your new compound a name eg. Simple Emitter.
At the moment all our settings are hidden away inside our new SimpleEmitter node, and this can be exported for use again as is, for even more handiness though, we can choose to expose some settings so attributes can be changed without having to open up the compound every time. To start with we’ll expose the N Value of the Every Nth Frame node and give it a friendlier name.
- Right click the Simple Emitter node, select Edit Compound
- Drag connect the Expose Input port -to- Every Nth Frame.N Value
- Right click on the newly created N Value port on the left and select Rename
- Name your port eg. Emit Every Frame
- Close the compound with the X in the top left.
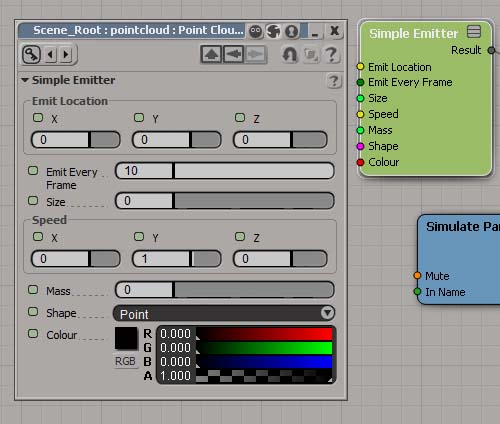
Now when you double click the Simple Emitter compound you can change the custom attribute Emit Every Frame with its own little slider. You can repeat these steps for the 3D Vector.Value and the attributes on the Set Data node, giving each of them names of your choice, you should end up with something like this:

Notice how much easier it is to read the Simple Emitter menu with everything in one place and all those exposed references hidden. You might also notice I took the opportunity to spell Colour correctly. 😉
Well that’s it for now, my first tutorial, I did say it was pretty basic, but I hope someone out there finds it in some way helpful. Crits and comments welcome.


this looks like nerd talk to to me!
Nerrrrrrrrrrr-er-er-er-ed!
< /Chewbacca >
Ditched Maya then? Don’t blame you 🙂
Nice tutorial.
Cheers Andy, yeah, swapped ALT for S, for the time being anyway 🙂
Looking forward to more XSI tutorials.
Cheers Curtis, I’ve got a few other random bits and bobs I’ll hopefully be writing up when I get a moment…